こんにちは。
当ブログでは「記事一覧ページをトップページとして表示する」カスタマイズを導入しています。
blog.wackwack.net
今回はこの味気ない一覧をもう少し何とかできないか!?と思い、
を作ってみました。と言ってもスクリプトは無し、CSSの設定のみです。
こんな感じになります
PCページの場合
記事を2列にレイアウトします。
マウスをかざした記事のバーの色が変わります。(この例では青→ピンク)

スマホページの場合
記事をカード風にレイアウトします。
アイキャッチとタイトルだけの見出しです。

はい、これだけです。
設定方法
トップページを記事一覧に設定する
ここで詳しくは解説しません。たくさん紹介記事があるので、そちらを参考に設定してください。
dokuwohaku.hateblo.jp
デザインCSSを設定する
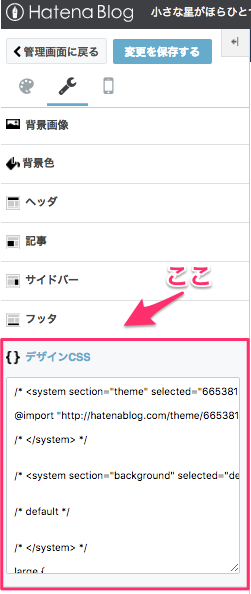
はてなブログ管理ページから「デザイン」→「カスタマイズ」→「デザインCSS」と進み、以下に示すCSSを貼り付けます。(長い!)
/* 記事一覧の並列表示 */

.archive-entries {
    text-align: center;
}

.page-archive .archive-entry-header {
    text-align: left;
    margin-bottom: 10px;
}

.page-archive .archive-entry-header .date {
    font-size: 80%;
    position: absolute;
    top: -30px;
    width: auto;
}

.page-archive .archive-entry-header .entry-title {
    font-size: calc(85% + 0.25vw);
    margin: 0;
    padding: 0;
    border: none;
}

.page-archive .archive-entry-header .entry-title a {
    font-size: inherit;
}

.page-archive .archive-entries .archive-entry {
    position: relative;
    display: inline-block;
    margin: 1.5rem 5px 0 5px;
    padding: 0 5px 3rem 5px;
    vertical-align: top;
    text-align: left;
    background-color: #fff;
    -webkit-box-sizing: border-box;
    box-sizing: border-box;
    border-bottom: none;
    border-left: none;
    border-right: none;
    border-top: 8px solid #1D3557;
    border-radius: 0;
    box-shadow: none;
    width: 45%;
}

.page-archive .archive-entries .archive-entry:hover {
    background-color: #f0f0f0;
    cursor: pointer;
    -webkit-transition: 500ms;
    transition: 500ms;
}

.page-archive .archive-entries .archive-entry:before {
    content: ' ';
    height: 8px;
    width: 0;
    background-color: #E63946;
    position: absolute;
    top: -8px;
    left: 0;
    -webkit-transition: 500ms;
    transition: 500ms;
}

.page-archive .archive-entries .archive-entry:hover:before {
    width: 100%;
}

.page-archive .archive-entries .archive-entry .archive-entry-body {
    margin-bottom: 1rem;
}

.page-archive .archive-entries .archive-entry .entry-description {
    margin: 0;
    line-height: 1.5em;
    font-size: 80%;
}

.page-archive .archive-entry .entry-thumb-link .entry-thumb {
    margin: 0 10px 0 0;
}

.page-archive .archive-entry .categories {
    text-align: left;
    margin: 0;
    padding: 0 5px;
    position: absolute;
    top: calc(100% - 3rem);
    left: 0;
    width: calc(100% - 10px);
    border: none;
    background-color: inherit;
    font-size: 80%;
}

.page-archive .archive-entry .categories a {
    font-size: inherit;
}

.archive-entry-body .social-buttons {
    display: none;
}

@media (max-width: 600px) {
    .page-archive #content,
    .page-archive #content-inner,
    .page-archive #main {
        padding: 0 0;
        margin: 0 0;
        width: 100%;
    }
    .page-archive #main {
        -webkit-box-sizing: border-box;
        box-sizing: border-box;
    }
    .page-archive .archive-entries {
        background-color: #f7f7f7;
        padding: 5px 0;
    }
    .page-archive .archive-entries .archive-entry {
        display: -webkit-inline-box;
        display: -moz-inline-box;
        display: -ms-inline-box;
        display: -webkit-inline-flex;
        display: inline-flex;
        -webkit-box-direction: normal;
        -webkit-box-orient: vertical;
        -moz-box-direction: normal;
        -moz-box-orient: vertical;
        -webkit-flex-direction: column;
        flex-direction: column;
        padding: 0 0;
        -webkit-box-shadow: 0px 0px 6px 0px #d6d6d6;
        box-shadow: 0px 0px 6px 0px #d6d6d6;
        border: none;
        border-radius: 4px;
        margin: 5px 5px;
    }
    .page-archive .archive-entries .archive-entry-header {
        -webkit-box-ordinal-group: 1;
        -moz-box-ordinal-group: 1;
        -ms-flex-order: 1;
        -webkit-order: 1;
        order: 1;
        display: -webkit-box;
        display: -moz-box;
        display: -ms-box;
        display: -webkit-flex;
        display: flex;
        -webkit-box-direction: inherit;
        -moz-box-direction: inherit;
        -webkit-flex-direction: inherit;
        flex-direction: inherit;
        padding: 0 5px;
    }
    .page-archive .archive-entry-header .date {
        -webkit-box-ordinal-group: 2;
        -moz-box-ordinal-group: 2;
        -ms-flex-order: 2;
        -webkit-order: 2;
        order: 2;
        position: static;
        padding: 0;
    }
    .page-archive .archive-entry-header .entry-title {
        -webkit-box-ordinal-group: 1;
        -moz-box-ordinal-group: 1;
        -ms-flex-order: 1;
        -webkit-order: 1;
        order: 1;
        line-height: 1.5;
        font-size: 3.5vw;
        height: calc(5vw * 3);
        overflow: hidden;
    }
    .page-archive .archive-entry-header .entry-title a {
        font-size: inherit;
    }
    .page-archive .entry-thumb {
        margin: 0;
        float: none;
        background-repeat: no-repeat;
        background-size: cover;
        width: 100%;
        border-top-left-radius: 4px;
        border-top-right-radius: 4px;
    }
    .page-archive .archive-entries .archive-entry .archive-entry-body {
        clear: both;
        display: none;
    }
    .page-archive .archive-entries .archive-entry .categories {
        -webkit-box-ordinal-group: 2;
        -moz-box-ordinal-group: 2;
        -ms-flex-order: 2;
        -webkit-order: 2;
        order: 2;
        position: static;
        font-size: 3vw;
        padding: 0 5px;
        background: none;
        border: none;
    }
    .page-archive .archive-entries .archive-entry:hover:before {
        width: 0;
    }
}
カスタマイズ
単にコピペするだけだと、お使いのテーマと合わなかったり不満な点があるでしょう。いくつかカスタマイズポイントを示します。
PC表示時のバーの色と背景色を変える
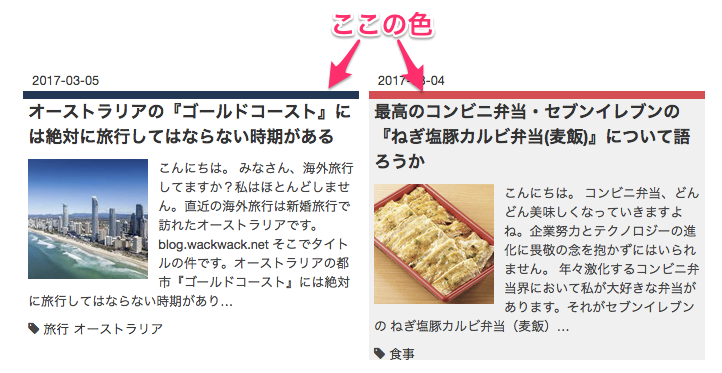
通常時の色
通常時の記事の背景色は37行目、バーの色は43行目のカラーコードで変更できます。
.page-archive .archive-entries .archive-entry {
    position: relative;
    display: inline-block;
    margin-top: 1.5rem;
    margin-left: 5px;
    margin-right: 5px;
    padding: 0 5px 3rem 5px;
    vertical-align: top;
    text-align: left;
    background-color: #fff;  /* 記事背景の色 */
    -webkit-box-sizing: border-box;
    box-sizing: border-box;
    border-bottom: none;
    border-left: none;
    border-right: none;
    border-top: 8px solid #1D3557;  /* バーの色 */
    border-radius: 0;
    box-shadow: none;
    width: 45%;
}
マウスオーバー時の色
マウスオーバー時の背景色は50行目、バーの色は60行目のカラーコードで変更できます。
.page-archive .archive-entries .archive-entry:hover {
    background-color: #f0f0f0;  /* マウスオーバー時の記事背景の色 */
    cursor: pointer;
    -webkit-transition: 500ms;
    transition: 500ms;
}

.page-archive .archive-entries .archive-entry:before {
    content: ' ';
    height: 8px;
    width: 0;
    background-color: #E63946;  /* マウスオーバー時のバーの色 */
    position: absolute;
    top: -8px;
    left: 0;
    -webkit-transition: 500ms;
    transition: 500ms;
}
マウスオーバー時のアニメーションを消す
マウスオーバー時にバーの色を変えたくない場合は49〜70行目を削除してください。
スマホ表示時のタイトル行数を変える
スマホでの一覧表示時にタイトルは3行目まで表示し、4行目以降は表示されません。
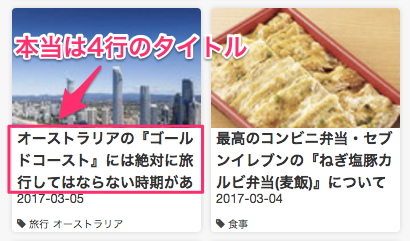
この表示行数を変えるには176行目の数値「3」を表示したい最大行数に変更します。
.page-archive .archive-entry-header .entry-title {
        -webkit-box-ordinal-group: 1;
        -moz-box-ordinal-group: 1;
        -ms-flex-order: 1;
        -webkit-order: 1;
        order: 1;
        line-height: 1.5;
        font-size: 3.5vw;
        height: calc(5vw * 3);  /* スマホでの表示タイトル行数 */
        overflow: hidden;
    }
アイキャッチの無い記事にデフォルトの画像を設定する
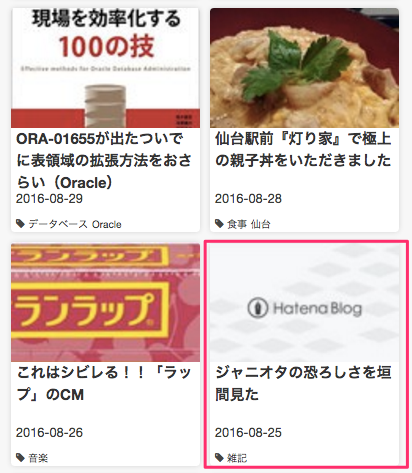
このカスタマイズ、スマホで一覧を見た時にアイキャッチの無い記事はこんな感じになってしまいます。
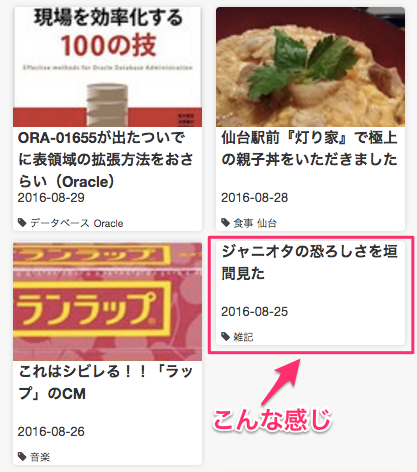
なんとも言えないカッコ悪さですがCSSだけでの解決方法が思い付きませんでした……
ということでアイキャッチの無い記事にデフォルトの画像を設定するスクリプトを添えておきます。
まずは以下のスクリプトをはてなブログ管理ページの「デザイン」→「カスタマイズ」→「フッタ」に貼り付けます。

<script src="https://ajax.googleapis.com/ajax/libs/jquery/3.1.0/jquery.min.js"></script>
<script type="text/javascript">
    $('#main-inner').ready(function() {
        "use strict";
        var pc_width = 600;
        var device = window.screen.width < pc_width ? 'sp' : 'pc';
        if (device === 'sp') {
            // ここにデフォルトの画像URLを設定
            var default_image = "http://cdn-ak.f.st-hatena.com/images/fotolife/W/WorldWorldWorld/20170320/20170320192021.jpg?1490005253";
            var archive_entries = $('.archive-entry');
            for (var i = 0; i < archive_entries.length; i++) {
                var entry_thumb = $(archive_entries[i]).find('.entry-thumb');
                if (entry_thumb.length == 0) {
                    var link_url = $(archive_entries[i]).find('.entry-title-link').attr('href').val;
                    var $default_thumb = $('<a href="' + link_url + '" class="entry-thumb-link"><div class="entry-thumb" style="background-image: url(' + "'" + default_image + "'" + ')"></div></a>');
                    $default_thumb.insertAfter($(archive_entries[i]).find('.archive-entry-body'));
                }
            }
        }
    });
</script>
次にデフォルトで表示したい画像をはてなフォトライフへアップロードし、上記スクリプトの9行目のURLをそれに書き換えます。
するとアイキャッチの無い記事にはデフォルトの画像が表示されるようになります。
注意事項
導入するにあたっては以下の点にご注意ください。
利用するテーマはレスポンシブデザインに対応していることを前提としています。
またテーマによってPC版とスマホ版のレイアウトが全く同じになるものには対応していません。(スマホでもPC版の表示になります。)
正常に適用されるかはご自分で確認をお願いします。
うまく適用されなくても当方で責任は負いません。ご利用は自己責任でお願いします。
以上、お暇があれば試してみてください。
一応いくつかのテーマでテストしています。
ご利用は自己責任ですが、うまくいかない場合は暇だったらできる限りは対応します。気軽にお声がけください。
余談
ZENO-TEALで良くない?
そうなんです。少し前に公開されためっちゃカッコよさげなテーマ『ZENO-TEAL』。
zeno-teal.hatenablog.com
これを使いたかったんですが、記事エントリーの1段落目に画像が必須であり、自分のブログでプレビューしたところトップページが残念なことになってしまったのです。
今から全記事にタイトル画像入れるのも面倒だし、デザイン性は皆無なカスタマイズを作ってみました。